


Sunday, February 28, 2010
Some more inspiration
I am busy working on a daygown that is not quite finished. So I thought I would share this little bit of inspiration with you.


A Touch of Spring Smocking
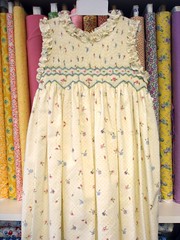
First posted by Knit One Smock Too
Doesn't this sweet dress make you think of warm spring days to come? I love the ruffles at the neck and sleeves.
Thursday, February 25, 2010
Sara is having a give away
If you haven't visited Sara Norris Ltd you are in for a treat. Sara does beautiful work and has some of her work featured in Sew Beautiful. Most notably on the cover of their baby issue one year.

She has recently done a red and white romper that just makes me smile!
Sara is hosting a give away for a pre constructed smocked bonnet. All you will have to do is smock it. The non fun part is done for you. So stop by and say hello to Sara and see some of her exquisite work.

She has recently done a red and white romper that just makes me smile!
Sara is hosting a give away for a pre constructed smocked bonnet. All you will have to do is smock it. The non fun part is done for you. So stop by and say hello to Sara and see some of her exquisite work.
Wednesday, February 24, 2010
More pics of Gone Fishin'

Here is the entire bubble after it has been washed and ironed. Its amazing what soap and water will do. I have no idea where I got this navy blue gingham seersucker. But I have used it a couple of times now. Really like. It is a substantial fabric. Teeny sequin buttons from Old Fashioned Baby.

I used square mother of pearl buttons from Bessie Mary. I thought they looked "manly." Not sure why the collar looks askew. Again camera operator skills.
And in answer to the comments about the collar post, I will have to take more pictures on the next daygown. I kind of had a brain lapse and thought I was done answering the question. Obviously not!
I can tell you what the next steps were, but as you can see the rest of the steps have been completed.
Having left off with basting the bias band onto the collar stack in the "Attaching a collar with a bias band" post, I stitched on the 5/8" seam line. Bumped my needle over to the right 1/8" inch, stitched a second time. Remove those hand basting threads. I trimmed the remaining seam allowance right up next to that second stitching. This is the same method I used in constructing the collar pieces themselves.

After stitching on the collar, trimming the seam allowance, I understitched the bias band to keep it from rolling to the outside. The stitching line closest to the collar is my understitching line. I then turned under my raw edge, using my edge joining foot again, I machine stitched the bias down to the romper fabric since there is a collar that will cover that stitching all the way around.

This shows the collar flipped up and that line of stitching used to stitch down the bias band to the underside. If there was not a full collar I would have stitched down the bias band by hand.
So I will try to remember to take additional pictures with this next collar. Because up next:

Tuesday, February 23, 2010
GONE! Fishin'

Just a quick note, we are no longer Goin' Fishin' we have Gone Fishin'! I was having trouble getting my pictures to cooperate this morning. I am sure it is the camera operator. This little romper is done and soaking in the sink right now. Maybe that is why my camera was protesting. The romper needed washing. I will take better pictures I hope when it is dry and ironed.

Saturday, February 20, 2010
Spring Inspiration

Originally uploaded by lollihops
A touch of spring in your sewing room! Does this sweet little pincushion not just make you smile? I see Easter baskets, daffodils and springtime when I look at this sweet little lamb perched on top of its springtime meadow.
Tuesday, February 16, 2010
Update on the suspected laundry

No that was NOT baby daughter's laundry! That massive pile was just a portion of her belongings that fit in one of the two cars plus a U-Haul driven from Louisiana. I didn't show the rest of the first floor that was also clogged with the rest of her "stuff." She has moved back home and is in search of new employment. They always come back with way more than they left with. I will admit she is making quick headway in putting it away. I knew I should have moved my sewing room into her old room a little more quickly. I won't procrastinate so much next time.
Attaching a collar with a bias band

First off, Happy Mardi Gras! There was milk punch, hurricanes, crawfish, red beans, rice and king cake had a plenty around here last night. Eat, drink and be merry for tomorrow we fast!

I received an email from Diana the other day asking about the steps involved in attaching a collar with a bias band. I will try to answer that here. Here is the front and backs of my "GoIng Fishin" romper ready for my collar. Layer one.

My completed collar. This will become Layer 2.

To insure that my collar remains together at the center front I like to take a stitch on the seam line of my two collar pieces. This is done in orange thread so you can see. In stitching my two collars, I obviously took a tiny bit bigger bite in the outer seam on one than the other. This resulted in one being a tad shorter than the other. So before I marked my seamline, I lined up the bottom edges, as opposed to the top raw edges. What would it matter if the raw edges met and the bottom of the collar wasn't even? So collar center stitched together.


For the third and top layer, my bias strip. I press a center mark into my bias strip.

I pin the bias strip on top of my collar starting at center front and working towards center back in the same manner I pinned the collar on. So do you see how you have three layers? The romper on the bottom, the collar next, topped by the bias strip.

For me it is easier to stitch without the pins in the way. So I basted my three layers together right above the seam line. I can assure that my collar is where I want it, the centers are where I want them having much more control when I baste it first. Only takes about 10 minutes and uses less time than taking the whole back apart when I am not happy with it. I did just notice that my two fish hooks don't appear even. Shoot.
This is as far as I got with this because next...

This happened! This is what it looks like when offspring return home. Baby daughter has moved back north and this was the first wave of unloading into my front entry way. Wish me luck.
Sunday, February 14, 2010
Smock a Valentine

originally posted by Angelasews
And I leave you with one of my favorite love songs. I have always loved the Elvis version of this song, but I may be a new convert of this one. Truly beautiful. How can you not love Andrea Bocelli?
Saturday, February 13, 2010
25 Years Later We Are Still One World, One Body
I don't care who you are, this will move your spirit. There are many ways to give, none more perfect than the other. Just choose one.
I had to laugh when I read some comment somewhere that this rendition wasn't as good as the original because 10 years from now some of the "voices" used wouldn't be known to many. I bet there are more than a few of the original recording that many people today wouldn't know either.
Doesn't matter, the spirit of giving is the same no matter the time or the voices used. Enjoy and then do your best to reach out and help those with less.
Friday, February 12, 2010
Beauty from Unexpected Source
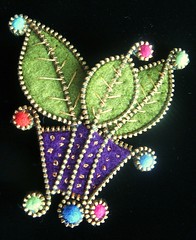
How cool is this? Who would have thought to use a utilitarian zipper to make something so pretty? Obviously this artist. Love it. Love the colors, love the contrast between the hard teeth of the zipper and the soft fuzziness of the wool felt. Very cool. There are some amazingly talented people in our world.
For another dose of cute go visit Sara and see her take on pretty today. Shoot just her new blog banner made me grin like a fool.
Tuesday, February 9, 2010
Sewing by Proxy-revisited

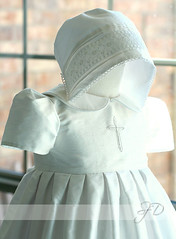
Remember this post where I helped a grandmother make a chirstening gown? Well she was gracious enough to send me pictures of the gown ON the baby. Now the gown is gorgeous, but the gown on the baby is over the moon.
If you can tear your eyes away from this gorgeous child, notice the beautiful smocking, precious teeny tiny piping, great pintucks and lace frill around the neckline.

The fabric she used is my absolute favorite, silky voile. This gown by this picture has been washed a couple of times and yet the fabric keeps it filmy floaty appearance.

And just one more to leave you with a smile. She is going to be a little heart breaker once she is a teenager. Beautiful baby. Beautiful gown.
This grandmother considers herself a beginner, I would beg to differ, but if you take a project slowly, ask for help when needed, start with the best materials you can afford, you too can create a wonderful confection.
Monday, February 8, 2010
Valentine Love-Wee Care in Pink

February says love, or so says Hallmark. And so does Wee Care. So what better way to celebrate February than with Wee Care. (Excuse my messy dining room table in the background.)

This little gown is from Lezette Thomason's Angel Gown pattern. It is very quick to make up and you can get two gowns out of one yard of fabric. It never says on the pattern but I think this would fit a 4-5# baby. I did both of these gowns in an afternoon and evening. While the men around here watched that football game. I did take a break and make some jambalaya. I am sure that is why the Saints won. I have wonderous powers. :)

I used Imperial batiste and did lace shaping on the front as opposed to embroidery. I did not cut the fabric out from behind the lace.

The hem and sleeve edge are both finished with beading and edging.

The pattern called for 1/4" neck binding. After doing 1/8" so much I have come to prefer it, so on the second gown I made it the more narrow bias binding.

I love pink ribbon.
Now back to Goin' Fishin'
Sunday, February 7, 2010
Wednesday, February 3, 2010
Inspiration

First posted by tw7424
Isn't this just scrumptious? Love the smocking and since we have been talking about piping, look at that wonderful tiny piping. If you click on the pic you can really get a close look at her piping both at the yoke and on her collar. Of course this delight is a christening gown. So pretty
Tuesday, February 2, 2010
Goin' Fishin' Collar- Two piece collar tutorial

I am going to stitch together the collar today. In order for a collar to turn out the way you like there is one important thing you have to make sure you do. Cut the collar on grain! That dark gray line shows the direction of the grain of the fabric. If you look at the shape of this collar or a peter pan collar you can see where this would provide an opportunity for trouble. The shape is semi-circular. There is no way to avoid encountering a bias when cutting out, handling or attaching this collar. The bias is there for a reason, it will help your collar lie flat as well as roll over the edge of your neckline.
That bias can also be a pain in the ankle. (Or any other **a** word that comes to mind.) It will allow you to stretch the collar out of shape and off grain. Ever wonder why two collar pieces from the same pattern piece come out two different sizes? Even when you have cut them at the same time? Because in the handling or stitching you stretched one and didn't know it.
I learned this method of collars from Gail Doane. Her philospophy is, if you don't encounter the cut edge of the bias, you can't stretch it. I have become a follower of this philosophy. So here is how to construct the collars in a block. Both collar pieces are traced onto the fabric, keeping the straight of grain in mind. I embroidered it in a block. Now I will construct the collars in a block without cutting them out first.

I interface my collars with something called German interfacing. It is a woven fusible interfacing, that does not bubble or crinkle after your garment is washed. (It is shown here after my piping was applied because I forgot to take a picture until then. Pretend you don't see the piping.) It is imported/distributed by Debbie Glenn of Love and Stitches and is available at most heirloom shops. Yes it is more expensive than Pellon, (I HATE Pellon, with a passion!) but it outperforms it by far. I bought 2 yards and it has taken me almost 5 years to use it up. Yes it might cost more, but sometimes the cost is worth it. I only use it for collars, cuffs, button bands and yokes, so it lasts a long time. I am not making a prom dress out of it.

This collar will be piped. So another handy sewing tool, GLUE! Yes glue. I am only going to use four pins while constructing this collar. First I have made my piping and cut the piping seam allowance to match the seam allowance of my collar, which in this case is 5/8". I match the raw edge of my piping to the TRACED edge of my collar and glue that puppy down.


When you get to the corners of your collar, snip that seam allowance really close to your stitching. I have a son in law with a really annoying saying. "Its a physics thing." You have to release the pull on that seam allowance for the piping to turn the corner. No this is not too close. I almost could have snipped a teeny bit closer.

This is the wrong side of the collar with the piping glued on. You can see that the raw edge of the piping meets the traced edge of the collar. You can just make out the shadow of the piping seam, it falls right along the seam line of my collar.

I could have skipped this step since my piping is glued down, but to illustrate the steps of making the collar, I included it. I am stitching down my piping to my collar pieces. I use an edge joining foot for my Bernina. If you don't have an edge joining foot specific to your machine, Nancy's Notions sells a generic edge joining foot. Worth its weight in gold! If you enlarge the picture you can see that the blade of my foot is riding just inside of the stitching made from making the piping.

When approaching the corner, shorten your stitch length and pivot slowly around the corner. The shortened stitch length allows you to make a smoother turn around the corner. Again that physics thing.

Continue with both collar pieces. This is the back of the collar after the piping has been stitched down.


Stitching from the piped collar side of my collar sandwich I am going to use my previous stitching and my handy bamboo skewer to stitch my sandwich together. I actually "draw" a line in the fabric INSIDE that first stitching with my skewer. Then the blade of my edge joining foot rides right along that groove I drew. This helps me to not have that previous stitching peeking through when I turn my collar. Remembering to shorten your stitch length to about 1.5 and pivot around the corners, stitch both collar pieces.

see those three teeny stitches at the corner? Gahhh! But they are gone now.
Next I bump my needle over 1/8" (for my machine that is two steps) and stitch a second line of stitching. Again I ride my blade along the first stitching and since I moved my needle it allows me an even 1/8" second seam without having to watch where I stitch. I am using that blade of the foot to guide it.
Now I am going to cut out the collars. I trim RIGHT UP NEXT to that second stitching. Giving me that 1/8" finished seam allowance. I AM NOT GOING TO CLIP THIS SEAM ALLOWANCE! Did you hear that? I was hollering on purpose. I then turn the collar right side out as shown in the top collar piece.

Completed, non puckering, flat, smooth and even collars. Ready to attach to my neckline.
I hope this helps and if you ever get a chance to take a class from Gail Doane, DO IT!
Monday, February 1, 2010
Goin' Fishin'

First posted by Creations by Michie'
I reduced the pattern on my printer/copier by 10%, traced it onto a cotton fabric with a blue wash out marker and gathered my flosses.

I purchased a floor stand for my sit on hoops last summer while attending La Broderie Bayou in Louisiana. Of course like many things we have to have right then and right there, I haven't used it until now. But Oh boy! Is it a dream. Very comfortable to sit in my chair, have my embroidery stable, at a great height and ready to stitch without having to readjust either my hoop or my position in the chair. Love it.

I have several different sized hoops "on a stalk" designed for the sit on hoops. Using the large hoop I was able to hoop both collar pieces at once. These deep birch hoops really hold your fabric taut. I used a combination of shadow work, back stitch and stem stitch for this simple design. The design looks darker on the left as opposed to the right, because I didn't feel like retracing the design for the opposite collar. I'm lazy, so I just traced it on the wrong side to give myself a mirror image. If this were a more complex design I wouldn't have been able to do that. For four little fish, a few water waves and hooks, it was fine.
I have bee asked how I "tie on" for a design so that it doesn't show. There are many many methods for that. None of them more right than another, but this is one I use often. My order of work for these fish was, back-stitched tail, back stitch the side fin, shadow work the body, stitch the French knot eye, back stitch the top fin.

I tied on starting at the tale using an invisible running stitch. Looking at the photo you see that my running stitches are more on the wrong side of the fabric with only two tiny stitches, covering one fabric thread each, showing on the front. As I begin to stitch, I pull my thread through until the tail just disappears to the wrong side. I am going to back stitch back onto this invisible running stitch.

I have really brightened and blown up this photo so you can see the floss and fabric threads.
This is my needle heading back into the line of stitching, sinking down into the fabric, making sure I pierce that floss.

The pink square highlights that first completed back stitch. My needle is emerging up from the back to start my second back stitch, again piercing the floss on the back. I will re-enter the fabric in the same hole where my first stitch went down into the fabric. I will then continue on outlining his tail with the back-stitches.
Next up is collar construction.
Subscribe to:
Posts (Atom)


